
With Everest Forms, you can create forms for various purposes for your WordPress site. The user interface is so simple and intuitive so, you’ll be able to create professional and engaging forms in minutes. So let’s get started!
After you’re done installing and activating Everest Forms on your site, you can see the Everest Forms tab is added to your WordPress admin dashboard menu.
To create a new form, go to Everest Forms → Add New. Then, you’ll see the predefined form templates that you can choose form
Everest Forms Form Templates #
The plugin offers a set of templates such as Simple and Advanced Contact Form, Leave Request Form, Job Application Form, etc.

Some of the Templates are available in the Free Version of Everest Forms while some are only available for the Premium users. And, you can check which template is included for your version by the Free and Premium tabs in the top-right of the page.
These templates are created to make your work easier as they contain the form field required for the respective form type. So, if any of the templates look appealing to you, you can go with it.
OR, you can Start From Scratch. This option allows you to create a form from the very beginning so, you can add the form fields that are required.

After you choose a Template or Start From Scratch, you need to give the form a Name of your choice. Then, you’ll be taken to the Everest Forms form builder. The drag and drop feature of the form builder allows you to insert any form field and place it wherever you want.

On the left-hand side of the form builder, you can see the General Field, Advanced Fields, Payment Fields, and Survey Fields. The availability of the form fields is based on your Everest Forms Version. The Free Version offers 11 form fields which are enough to create any simple forms for your website. Whereas the premium form fields allow creating more advanced forms.
Now, let’s take a look at other features of the Everest Forms form builder.
Editable Form Name #
You can change the form name later in the form builder. There is an editable form name option Where you can click to change the form name in the form editor according to your needs.

Other Features of Form Builder #
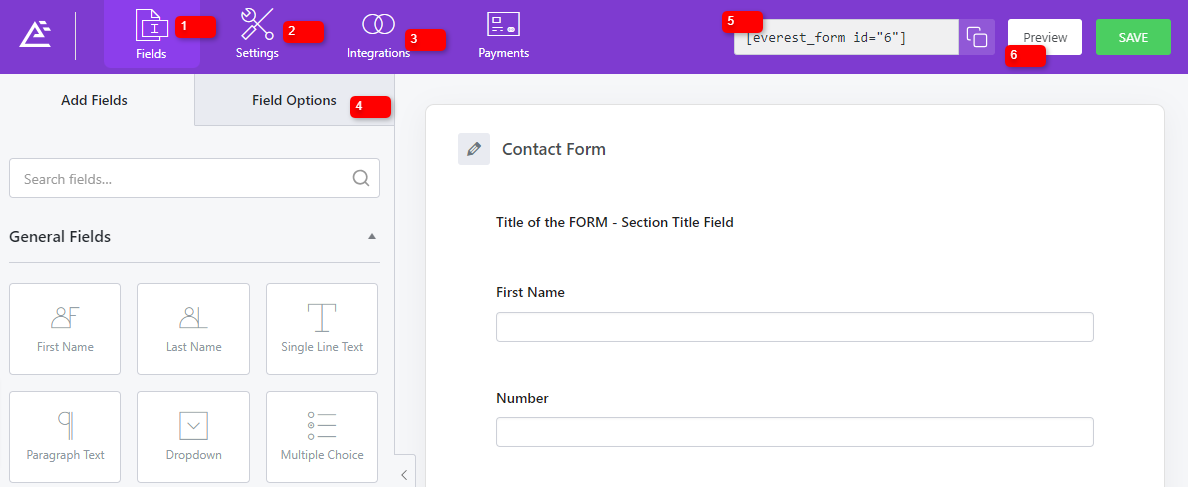
Just so you get familiar with other features of Everest Forms form builder, we are listing them here:
- Settings: This tab allows you to change the General and Email Settings for the individual form. You can check out the documentation for this tab.
- Integrations: Only premium users will be able to view and access this tab as it contains the settings for the integrations through the Everest Forms add-ons.
- Payments: Same as Integrations, only the users with the pro plan with PayPal and Stripe Add-on will be able to access this tab.
- Field Options: This tab will show the field settings such as labels, descriptions, required options, and others for each form field. Clicking on the form field will display the Field Options automatically.
- Shortcode: This field provides you with the shortcode for the individual form. This shortcode and be used to insert your form to any post or pages.
- Preview: Clicking on the preview button will give a live preview of what your form looks like currently in the frontend of your website.
Row Settings/Format: #
You can select each row’s format to be one, two, three, or four columns. For this, hover to the respective row, and on the top right, click on the ‘pencil’ icon.
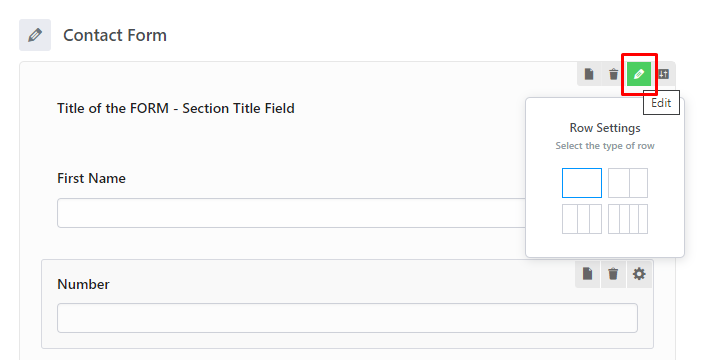
Now, select the desired number of columns for the row.
Lastly, you can click on the SAVE button next to the PREVIEW option to save your form. Now, your form will be added to the All Forms tab of Everest Forms. And, you can view, edit and delete the form there whenever you need it.


