
HubSpot CRM is a free CRM platform that can be used by anyone. It comes with a robust collection of capabilities that allow a team to get a thorough picture of their sales pipeline while being time-efficient.
Installation #
- Firstly, you need to purchase the Everest Forms Pro plugin.
- After the successful purchase, you will get the plugin zip file under your WPEverest account page.
- Now, you can download the Everest forms pro plugin and HubSpot add-on from there.
- Through your WordPress Dashboard, visit Plugins -> Add New -> Upload and then choose the downloaded zip file and then install and activate it.
- Now you are ready to use this add-on for your site.
Alternative Method:
- Once you have entered the Everest Forms Pro license on your site, go to Everest Forms > Add-ons.
- Search for the ‘HubSpot‘ add-on.
- Click on ‘Install‘.
- Once the installation is finished, click on ‘Activate‘. The add-on will be activated.
Setup and Configuration #
You will need to have a HubSpot API in order to integrate the Everest Forms with the HubSpot. Follow the steps below for this.
Setting up the API Key #
Words from HubSpot: Starting November 30, 2022, all customers will no longer have access to API Keys and in-turn will no longer be able to use API Keys as an authentication method with HubSpot APIs
Therfore, you will have to authenticate with OAuth.
Also, old users can switch on or after November 30.
- Sign in to the HubSpot account, or create one from here.
- Go to Account name (on the top right) > Personal & Preferences > Integration > API.
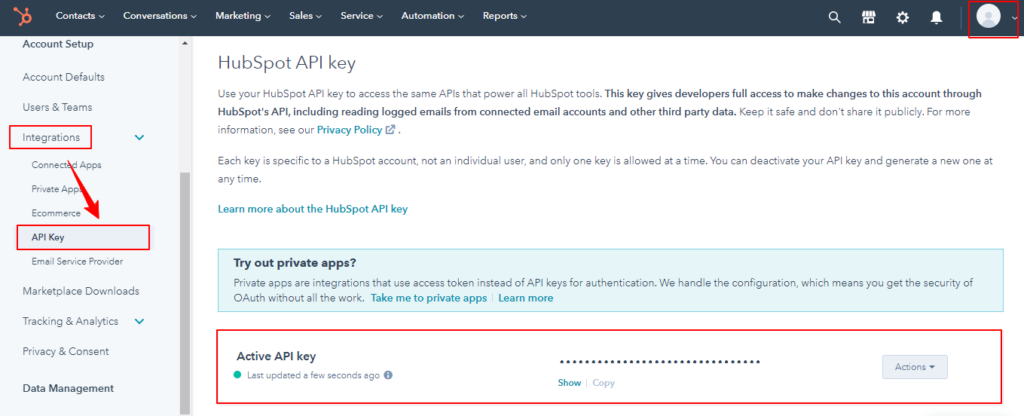
- Copy the API key to a clipboard.
Create HubSpot List #
- Go to your account.
- On the top right, go to Contacts > Lists.

- Click on ‘Create List’.
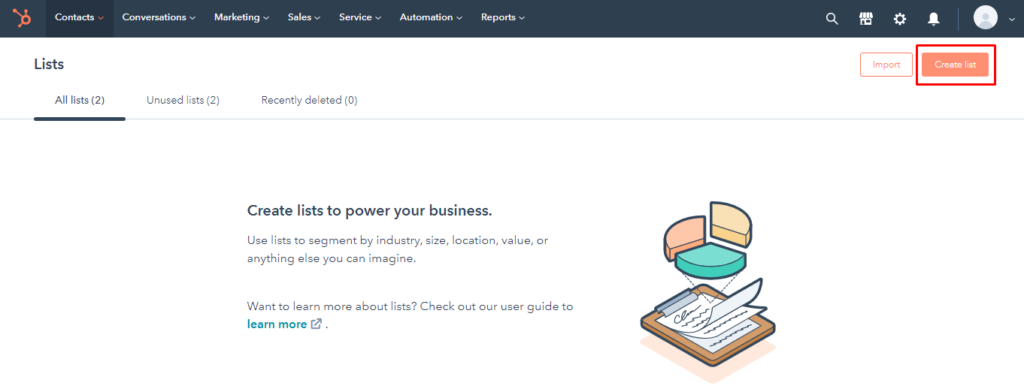
- Give the name to the list.
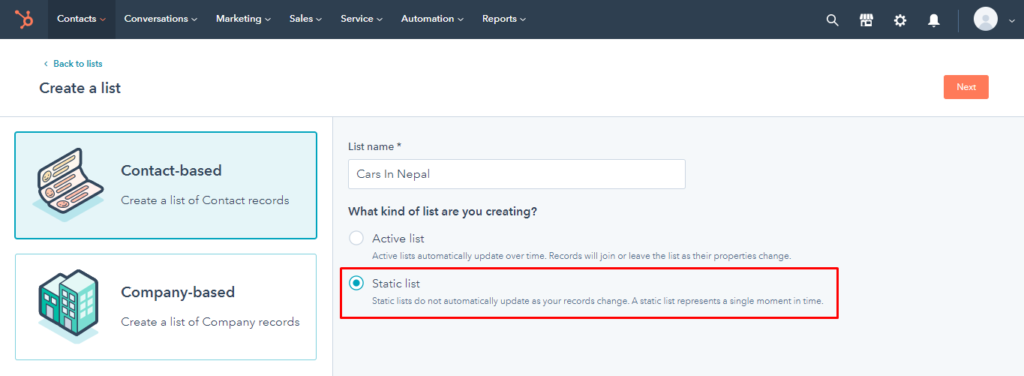
Note: While creating lists, please make sure that the list is a Static list because the HubSpot integration won't happen with the Acitve Lists.
- Click ‘Next’ and then ‘Save List’. The list is thus created.
HubSpot OAuth #
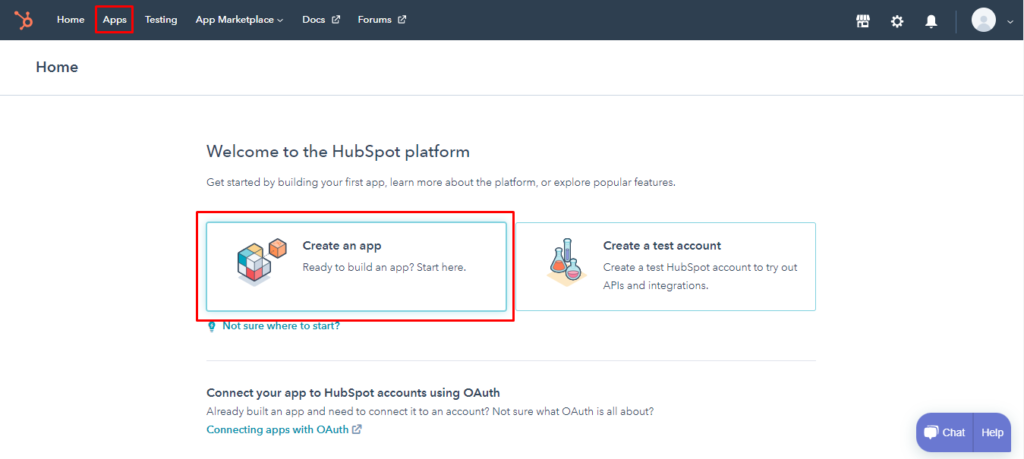
- Log in or sign up for your HubSpot Developer Account.
- First, create an app in a HubSpot developer account
- After creating the app, you’ll be able to find the app’s client ID and client secret on the Auth page of your app settings. Copy these codes to a clipboard.
- Add the Redirect URL in the following format.
yoursite.com/wp-admin/?evf_hubspot_auth=1 - Now, add the scopes given in the screenshot below. [crm.lists(Read,Write), crm.objects.contacts(Read,Write), oauth]

- Click on ‘Save’.
- Now, go to ‘Testing‘.
- Click on ‘Create app test account‘.
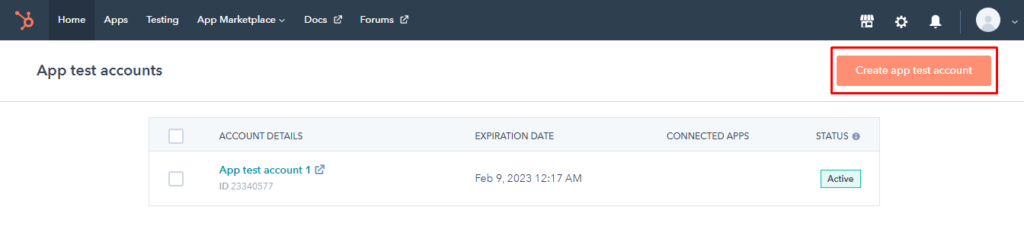
- Provide a suitable name for your app. And then follow the steps on Create List.
Integrating the HubSpot CRM with Everest Forms(OAuth) #
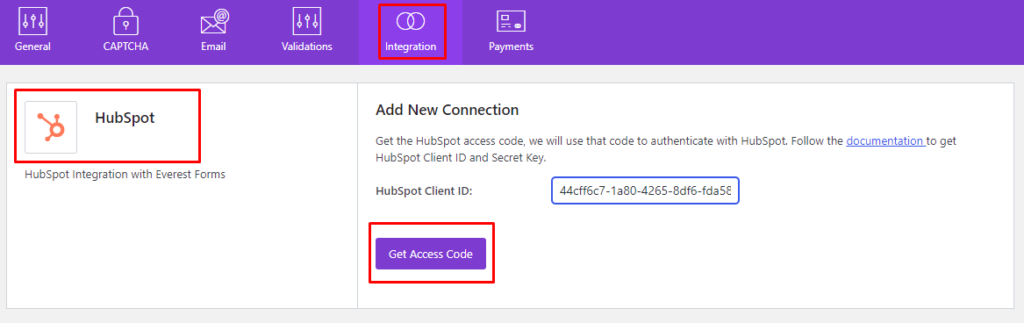
Once you have generated and copied the client ID and Secret from the HubSpot account, go to Everest Forms > Settings > Integration > HubSpot. Add the Client ID to the ‘HubSpot Client ID:‘ box. Now, click on ‘Get Access Code’.
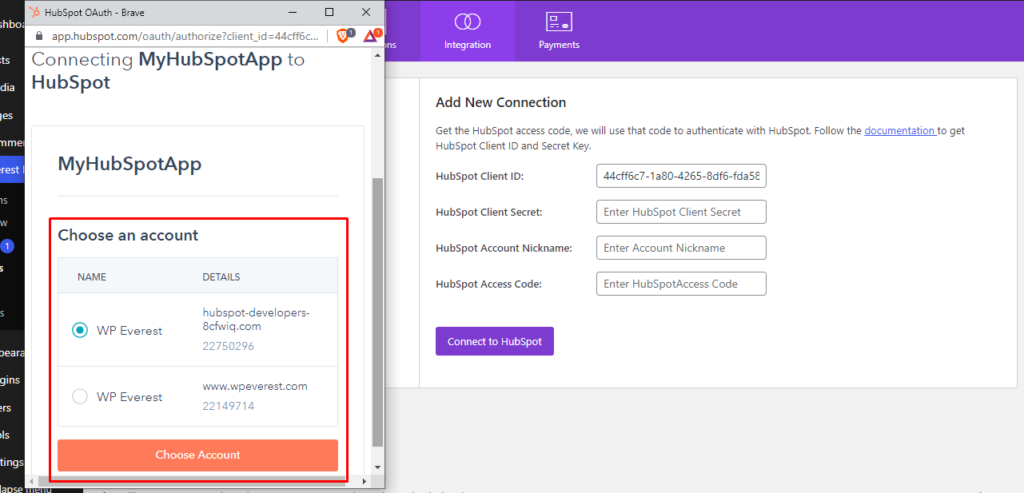
- You will see the following pop-up window. Select the respective account and click on Choose Account.
- Click on ‘Connect Account’ in the next window.
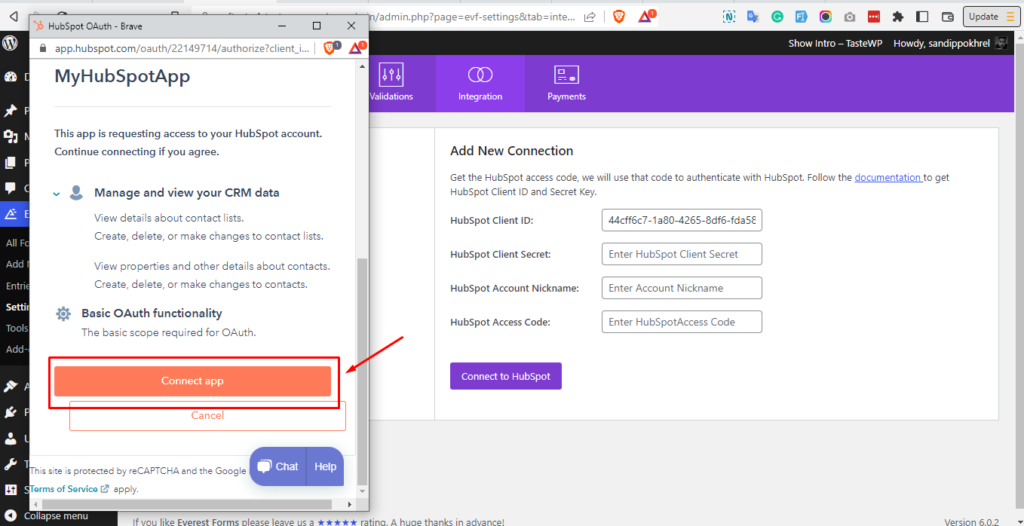
Now, you will get the access code. Copy and paste it to the HubSpot Access Code box.
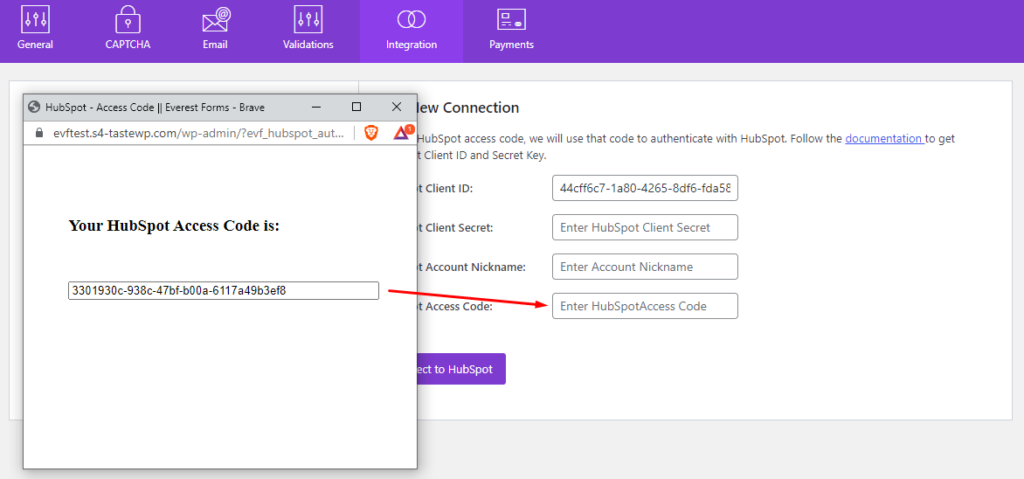
Now, add a nickname and click on ‘Connect to HubSpot’ to integrate the HubSpot CRM.
Note: You can add multiple API keys from the settings.
Integrating the HubSpot CRM with Everest Forms(API) #
Once you have generated and copied the API key from the HubSpot account, go to Everest Forms > Settings > Integration > HubSpot. Add the API key to the ‘HubSpot API Key’ box. Also, add a nickname besides the API key box.
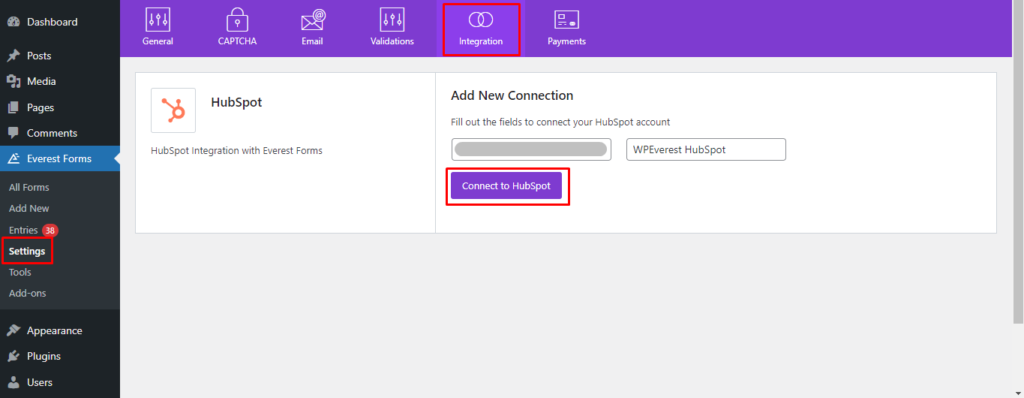
Now, click on ‘Connect to HubSpot’ to integrate the HubSpot CRM.
Note: You can add multiple API keys from the settings.
Adding Connections for individual forms #
Once you have set up the API key on the main settings, it’s time for you to add a new connection for your forms. For this, go to the required form’s editor page. Click on ‘Integration’ from the available tabs. You will find an option called ‘HubSpot‘ from which you can add a new connection.
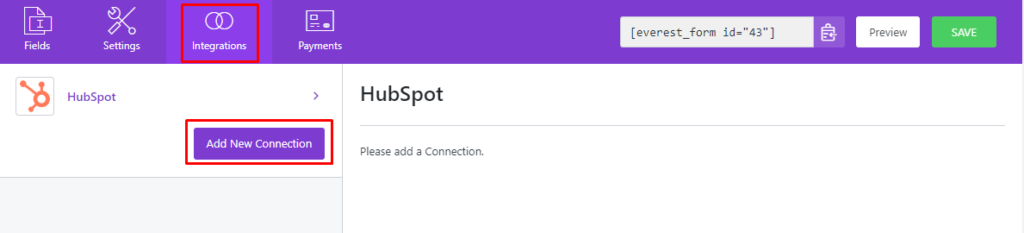
- Click on the ‘Add New Connection‘ button and a pop-up will appear. Add the name of the connection.
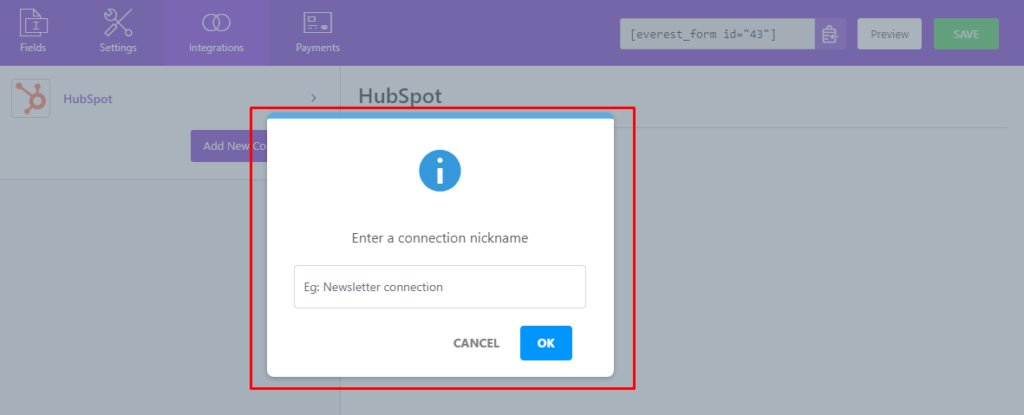
- Click on ‘OK‘ after adding the name and the connection is added.
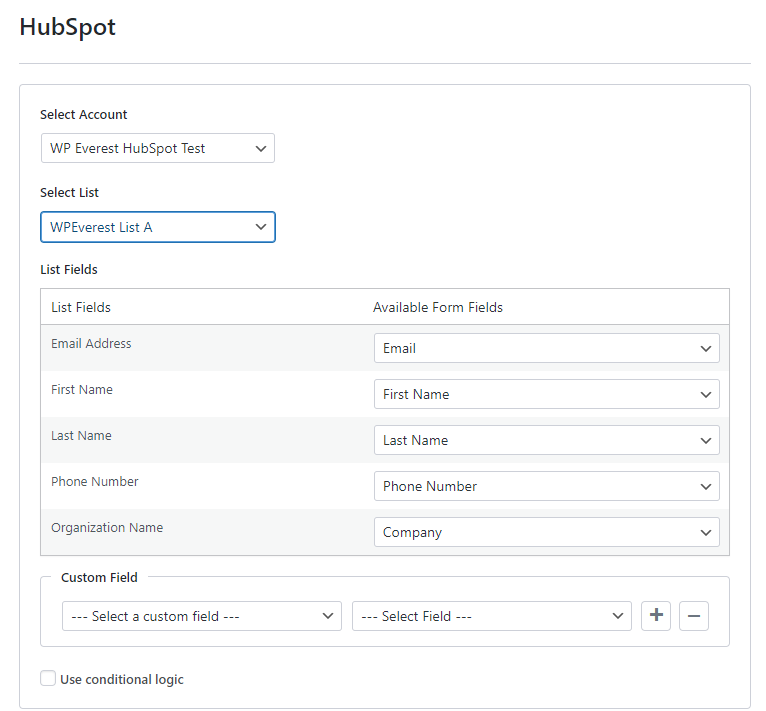
- Select Account: Select the available HubSpot accounts for connecting the form.
- Select List: Select one of the available lists.
- List Fields: Map the matching fields from the form fields.
- Custom Fields: Match the Everest Forms fields with the HubSpot custom fields from the available lists of the custom fields.
How to use conditional logic for HubSpot connections? #
To use conditional logic, enable the option by ticking the ‘Use Conditional Logic’ option at the bottom of every connection you make.
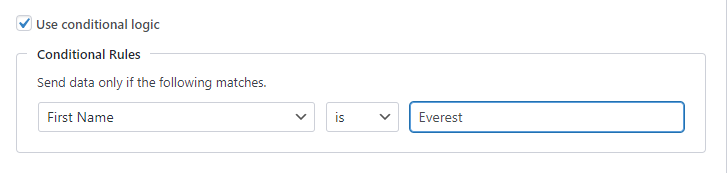
In the above example, the form sends data to the HubSpot account only if the First Name is ‘Everest’.
Note: You can add more than one connections.


